一、集成开发环境
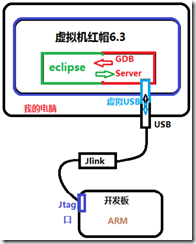
软件部分:eclipse , GDB Server , Jlink软件
硬件部分:Jlink硬件
准备工作1:从SD/NOR Flash启动,格式化nand flash
准备工作2:硬件连接
1. Jlink连接
2. 串口连接
3. nand启动
二、安装GDB Server
解压:tar xvzf arm-linux-gdb-7.5.tar.gz
进入目录:cd arm-linux-gdb-7.5
编译安装:./build-all
上面执行好后,gdb工具就安装好了,安装在/opt/arm-linux-gdb
为了方便使用,需要添加环境变量:vim /root/.bashrc
在交叉编译链的前面添加gdb的环境变量:
export PATH=$PATH:/opt/arm-linux-gdb/bin/
export PATH=$PATH:/usr/local/arm/4.3.2/bin/
之后保存,退出。这就可以直接运行arm-linux-gdb,如果不行的话则可能是添加错误,或者需要注销。
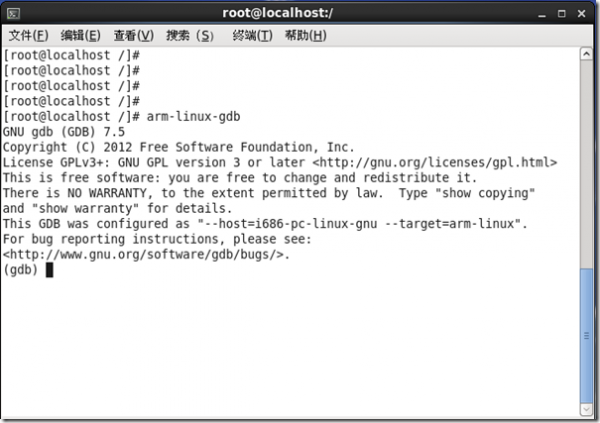
问:为什么一定要添加到交叉编译链之前呢?
答:因为在交叉编译链中也包含了arm-linux-gdb,linux系统会根据path环境变量的先后顺序来寻找,我们需要找的是我们上面安装的,而不是这里的(因为版本可能不对),所以在添加环境变量的时候,一定要添加在交叉编译链的前面。
三、安装Jlink软件
解压:tar xvzf JLink_Linux_V434a.tgz
进入目录:cd JLink_Linux_V434a
库:cp -d libjlinkarm.so* /usr/lib -f
:cp 45-jlink.rules /etc/udev/rules.d/
上面四个命令执行完之后,检测是否能够检测到Jlink的连接:
在虚拟机的下面,点击显示为Jlink相关的usb图标,连接。
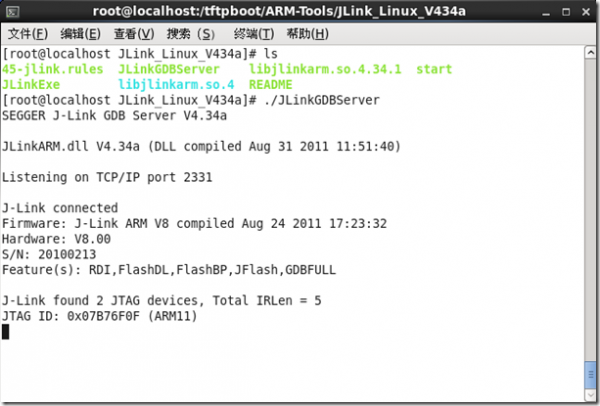
执行命令:./JLinkGDBServer
如果也切顺利的话,会显示连接上的ARM核心为ARM11:

四、安装Eclipse软件
红帽企业版6.3中默认安装了eclipse
执行:which eclipse 可以查看在哪个目录下
这个版本不适合,我们不能用,所以首先我们得卸载这个,其实我们把查询到的eclipse修改一个名字就好了,在查询到的目录执行:mv eclipse eclipse-back即可。
安装自己的eclipse:
解压:tar zxvf eclipse-cpp-helios-SR2-linux-gtk.tar.gz
进入目录:cd eclipse-cpp-helios-SR2-linux-gtk
运行程序:./eclipse
这就启动eclipse了。
然后选择自己的工程目录:
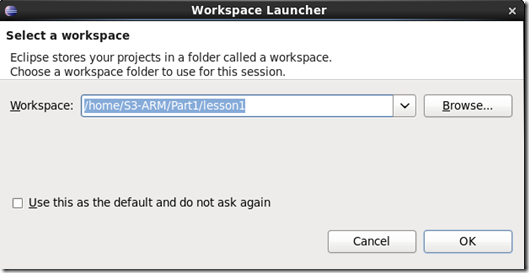

配置eclipse:
首先得安装一个插件,这个插件是要通过网络安装的,所以linux必须能够上网。
安装插件:点击菜单栏的help -> install new software
在Work with输入插件位置:http://opensource.zylin.com/zylincdt ,点击add
经过一段时间,在下面的方框中显示出找到的插件,点击选中:
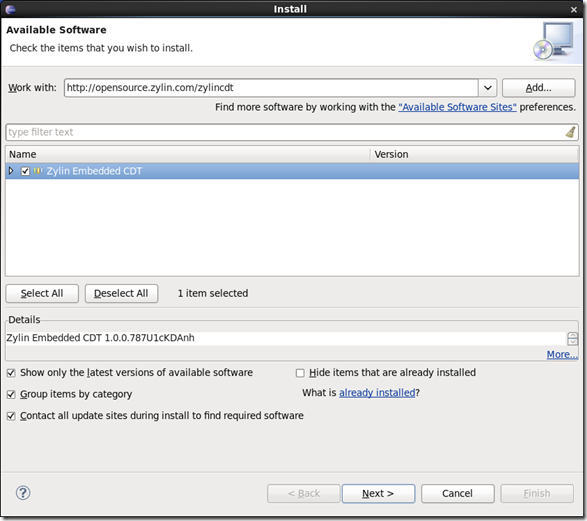
点击next;
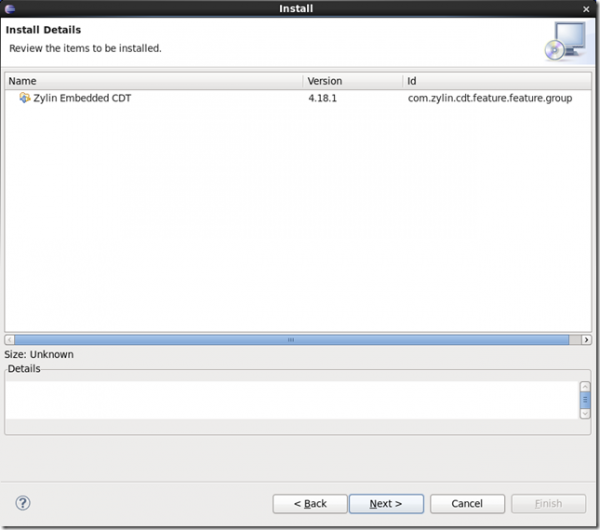
之后按照提示来。
然后重启:

使用eclipse进行开发
新建工程,选择新建一个已存在源文件的工程:
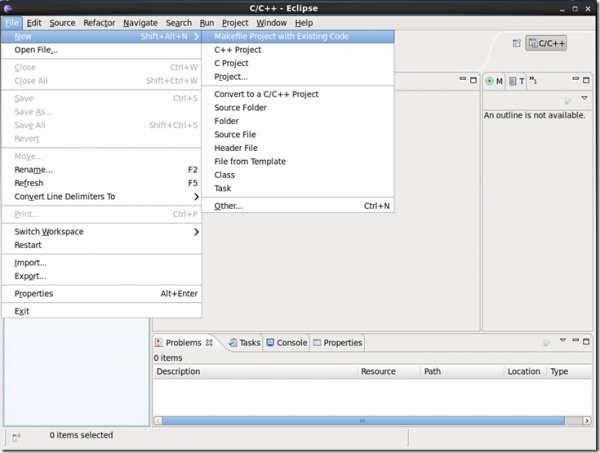
注意:这里的源文件目录必须是在工作目录下的另外一个目录,比如工作目录是"/home/S3-ARM/Part1/lesson1",那么【Existing Code Location】的目录为不能和工作目录相同,必须是别的目录,或者是工作目录下的一个子目录,比如"/home/S3-ARM/Part1/lesson1/led/"或者是"/opt/led/"
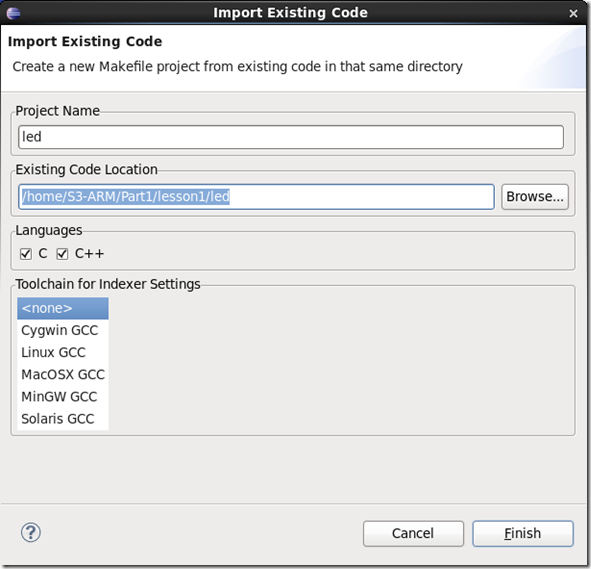
点击finish。
编译项目:【Project】 -> 【Build All】
注意:取消掉【Project】里面的自动编译【Build Automatically】
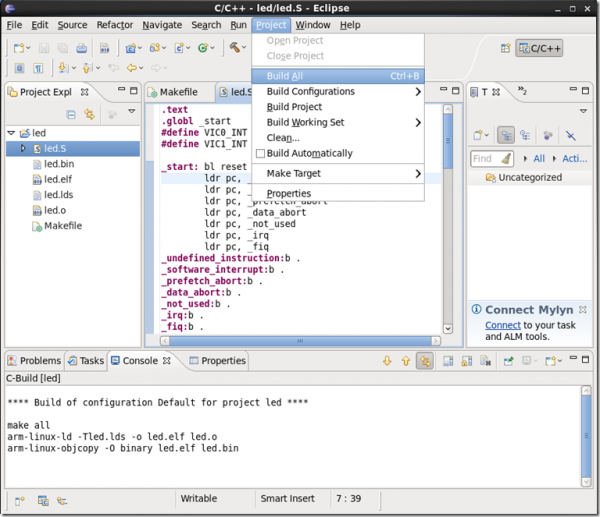
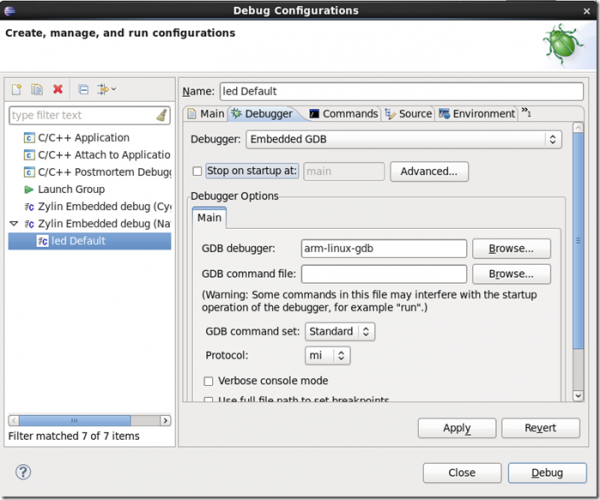
配置调试器:【甲虫图标】 -> 【Debug Configurations】
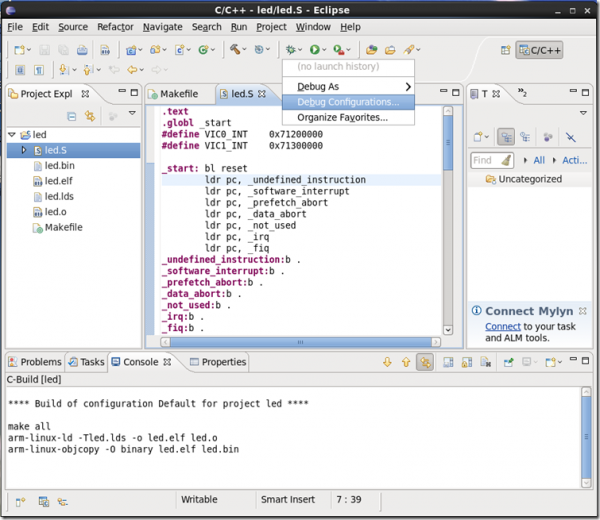
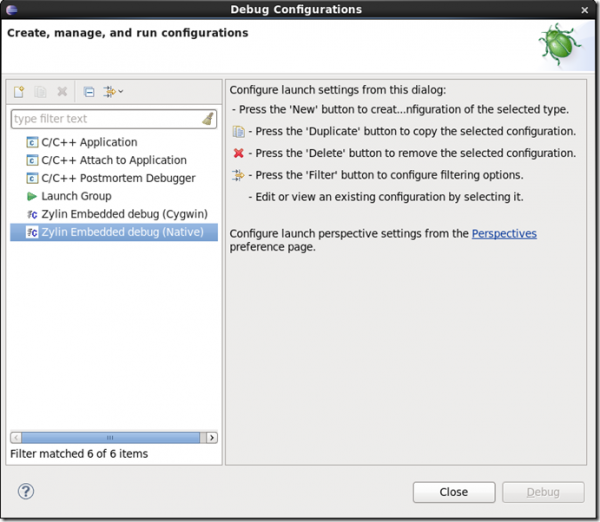
双击【Zylin Embedded debug】,出现如下界面:
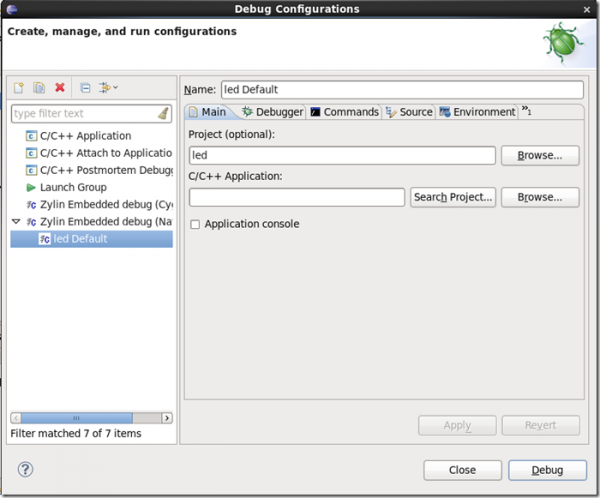
选中选项卡【main】
在【C/C++ Application】中选择要调试的项目,注意是选中 "xxx.elf" 文件:
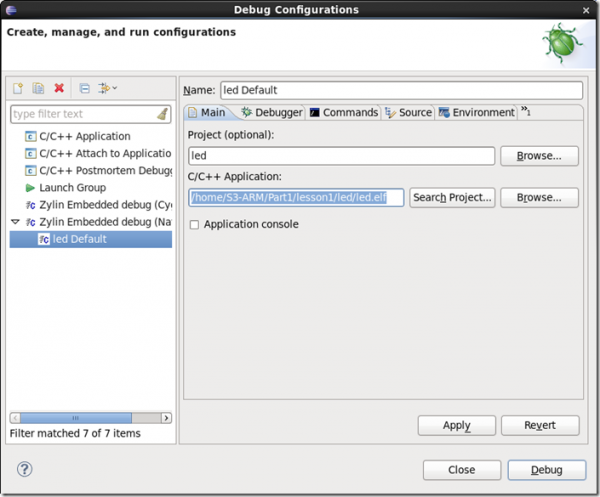
选中选项卡【Debugger】
去掉【Stop on startup at:】选项
将【GDB debugger:】修改成" arm-linux-gdb "
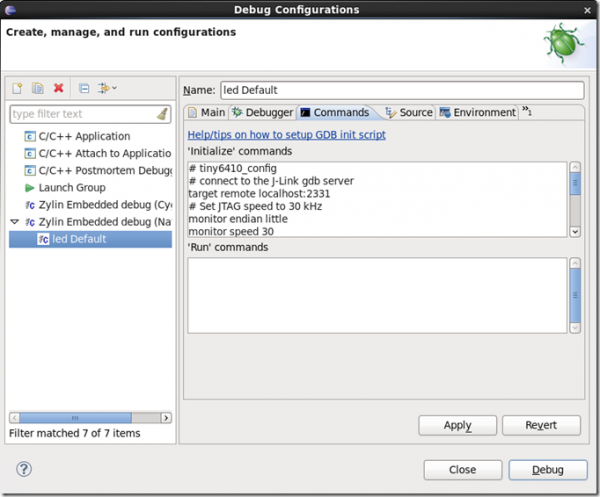
选中选项卡【Commands】
在【'Initialize' commands】中填入如下初始化指令:
下面是初始化S3C6410处理器的初始化脚本
1 # tiny6410_config 2 # connect to the J-Link gdb server 3 target remote localhost:2331 4 # Set JTAG speed to 30 kHz 5 monitor endian little 6 monitor speed 30 7 # Reset the target 8 monitor reset 9 monitor sleep 10 10 # 11 # CPU core initialization (to be done by user) 12 # 13 # Set the processor mode 14 monitor reg cpsr = 0xd3 15 #config MMU 16 #flush v3/v4 cache 17 monitor cp15 7, 7, 0, 0 = 0x0 18 #/* flush v4 TLB */ 19 monitor cp15 8, 7, 0, 0 = 0x0 20 #disable MMU stuff and caches 21 monitor cp15 1, 0, 0, 0 =0x1002 22 #Peri port setup 23 monitor cp15 15, 2, 0, 4 = 0x70013 24 #disable watchdog 25 monitor MemU32 0x7e004 = 0x00 26 monitor sleep 10 27 #disable interrupt 28 monitor MemU32 0x71214 = 0x00 29 monitor MemU32 0x71314 = 0x00 30 monitor MemU32 0x7120C = 0x00 31 monitor MemU32 0x7130C = 0x00 32 monitor MemU32 0x71200F00 = 0x00 33 monitor MemU32 0x71300F00 = 0x00 34 #set clock 35 monitor MemU32 0x7e00f900 = 0x0801e 36 monitor MemU32 0x7e00f = 0x0ffff 37 monitor MemU32 0x7e00f004 = 0x0ffff 38 monitor MemU32 0x7e00f020 = 0x01043310 39 monitor MemU32 0x7e00f00C = 0xc2150601 40 monitor MemU32 0x7e00f010 = 0xc2150601 41 monitor MemU32 0x7e00f024 = 0x03 42 monitor MemU32 0x7e00f014 = 0x00200102 43 monitor MemU32 0x7e00f018 = 0x00 44 monitor MemU32 0x7e00f01C = 0x14007 45 #config sdram 46 monitor MemU32 0x7e00f120 = 0x08 47 monitor MemU32 0x7e001004 = 0x04 48 monitor MemU32 0x7e001010 = 0x0040f 49 monitor MemU32 0x7e001014 = 0x06 50 monitor MemU32 0x7e001018 = 0x01 51 monitor MemU32 0x7e00101c = 0x02 52 monitor MemU32 0x7e001020 = 0x06 53 monitor MemU32 0x7e001024 = 0x0a 54 monitor MemU32 0x7e001028 = 0x0c 55 monitor MemU32 0x7e00102c = 0x0018f 56 monitor MemU32 0x7e001030 = 0x0c 57 monitor MemU32 0x7e001034 = 0x02 58 monitor MemU32 0x7e001038 = 0x02 59 monitor MemU32 0x7e00103c = 0x02 60 monitor MemU32 0x7e001040 = 0x02 61 monitor MemU32 0x7e001044 = 0x13 62 monitor MemU32 0x7e001048 = 0x13 63 monitor MemU32 0x7e00100C = 0x10012 64 monitor MemU32 0x7e00104C = 0x00b45 65 monitor MemU32 0x7e001200 = 0x150f8 66 monitor MemU32 0x7e001304 = 0x00 67 monitor MemU32 0x7e001008 = 0xc0 68 monitor MemU32 0x7e001008 = 0x00 69 monitor MemU32 0x7e001008 = 0x40 70 monitor MemU32 0x7e001008 = 0x40 71 monitor MemU32 0x7e001008 = 0xa0 72 monitor MemU32 0x7e001008 = 0x80032 73 monitor MemU32 0x7e001004 = 0x00 74 # Setup GDB for faster downloads 75 #set remote memory-write-packet-size 1024 76 set remote memory-write-packet-size 4096 77 set remote memory-write-packet-size fixed 78 monitor speed 12 79 break _start 80 load
初始化2440的脚本内容如下:
1 # connect to the J-Link gdb server 2 target remote localhost:2331 3 # Set JTAG speed to 30 kHz 4 monitor endian little 5 monitor speed 30 6 # Reset the target 7 monitor reset 8 monitor sleep 10 9 # 10 # CPU core initialization (to be done by user) 11 # 12 # Set the processor mode 13 monitor reg cpsr = 0xd3 14 #config MMU 配置MMU 15 #flush v3/v4 cache 16 monitor cp15 7, 7, 0, 0 = 0x0 17 #/* flush v4 TLB 协处理器*/ 18 monitor cp15 8, 7, 0, 0 = 0x0 19 #disable MMU stuff and caches 20 monitor cp15 1, 0, 0, 0 =0x1002 21 #Peri port setup 22 monitor cp15 15, 2, 0, 4 = 0x70013 23 #disable watchdog kangear 关闭看门狗 24 monitor MemU32 0x53 = 0x00 25 monitor sleep 10 26 #disable interrupt kangear 关闭中断 27 monitor MemU32 0x4A008 = 0xffffffff 28 monitor MemU32 0x4A01C = 0x7fff 29 #set clock 30 #initialize system clocks locktime register 31 monitor MemU32 0x4C = 0xFF 32 #initialize system clocks clock-divn register 33 monitor MemU32 0x4C014 = 0x5 #CLKDVIN_400_148 34 #initialize system clocks mpll register 35 monitor MemU32 0x4C004 = 0x7f021 #default clock 36 #config sdram 37 monitor MemU32 0x53 0x00 38 monitor MemU32 0x4A008 0xFFFFFFFF 39 monitor MemU32 0x4A01C 0x007FF 40 monitor MemU32 0x53 0x00 41 monitor MemU32 0x56050 0x055AA 42 monitor MemU32 0x4C014 0x07 43 monitor MemU32 0x4C 0x00FFFFFF 44 monitor MemU32 0x4C004 0x61012 45 monitor MemU32 0x4C008 0x40042 46 monitor MemU32 0x48 0x22120 47 monitor MemU32 0x48004 0x02F50 48 monitor MemU32 0x48008 0x00700 49 monitor MemU32 0x4800C 0x00700 50 monitor MemU32 0x48010 0x00700 51 monitor MemU32 0x48014 0x00700 52 monitor MemU32 0x48018 0x7FFFC 53 monitor MemU32 0x4801C 0x18005 54 monitor MemU32 0x48020 0x18005 55 monitor MemU32 0x48024 0x008E0459 56 monitor MemU32 0x48028 0x32 57 monitor MemU32 0x4802C 0x30 58 monitor MemU32 0x48030 0x30 59 # Setup GDB for faster downloads 60 #set remote memory-write-packet-size 1024 61 monitor speed auto 62 break _start 63 load
初始化210的脚本内容如下:
1 # connect to the J-Link gdb server 2 target remote localhost:2331 3 # Set JTAG speed to 30 kHz 4 monitor endian little 5 monitor speed 30 6 # Reset the target 7 monitor reset 8 monitor sleep 10 9 # Setup GDB for faster downloads 10 #set remote memory-write-packet-size 1024 11 monitor speed auto 12 break main 13 load
经过上面的设置之后,就可以开始调试了
五、开始调试
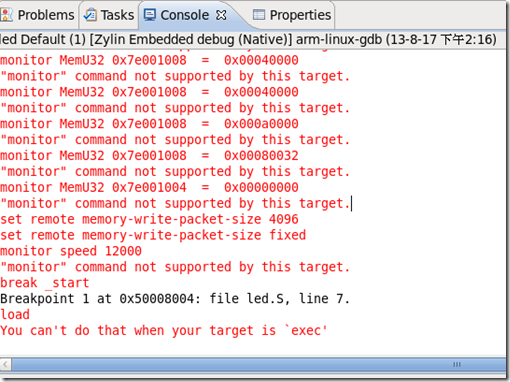
注意:用eclipse进行调试的时候必须保证JLinkGDBServer同时在运行
否则会出现类似下面的错误:
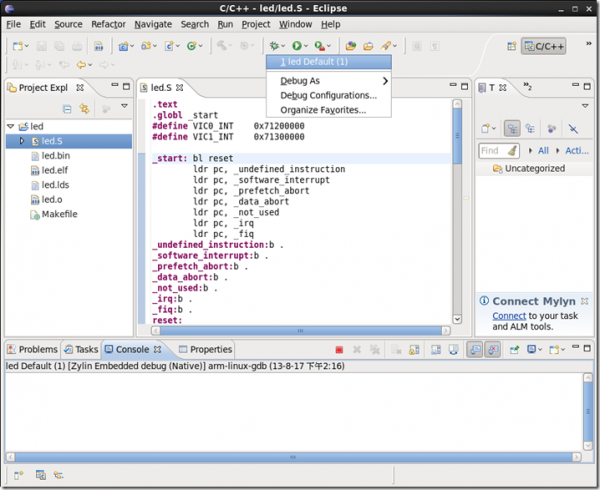
保证JLinkGDBServer运行起来了,然后点击【小甲壳虫】 -> 项目名
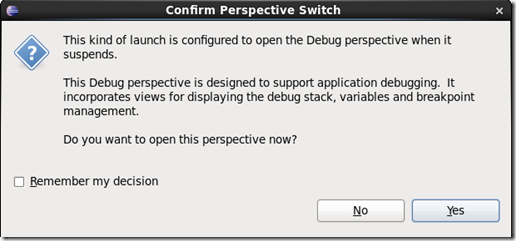
准备进入调试界面
选择【yes】
调试界面如下:
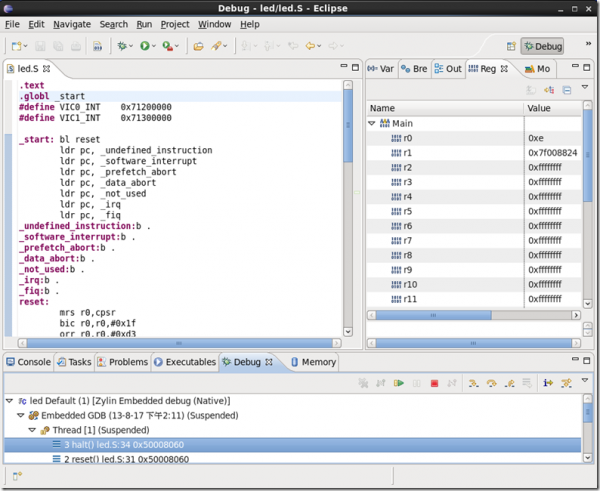
点击【F5】是"Step Into"
【F6】是"Step Over"
等等,这里可以查看寄存器的值,没存的值等等。
一步一步下去可以看到开发板上的led点亮了。


 嵌入式C语言自我修养——从芯片、编译器到操作系统 带目录 文字版


 京公网安备 11010802033920号